Category: Photoetch

Custom Photoetch Set Part VI

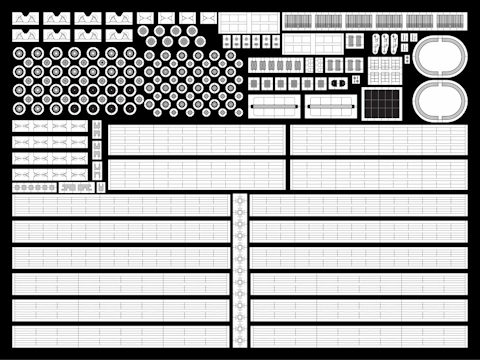
Another etch? Well, the design I showed in part V was fine, except that I’d used very dark gray instead of black in Illustrator. A nice dotted pattern was visible over almost all the parts. The railing were fine though and only a few parts were repeated.

With only a few parts and an A5 area to fill, I could place a ‘spare’ set on the other side. The UP launcher parts and some gratings for the bridge floor were drawn in three versions as I experimented with different line thicknesses for the mesh from 0.05 to 0.075 mm, the smallest working just fine (not entirely etched through everywhere, but that’s not visible to the naked eye when the model is done). The hawser reels can now be redone (sigh) but at least I can now solder them. The rest are spare parts and I added the stairs so I now have brass versions. The etch was again made by Hauler; there was less than one week between submitting my order and delivery of the etch!

Custom Photoetch Set Part V

I’ve recently bought a new airbrush and started to experiment with painting. I thought I had the proper wash/rinse/primer order figured out but the primer didn’t hold well and the UP launchers and cordage reels are now ruined. I blame the Vallejo primer that doesn’t adhere to the Alpaka (neusilber) nor to the resin I used. Vallejo primer doesn’t spray as well as basic Humbrol enamels that give better adherence and scratch resistance; why even use a primer? Back to the etch.

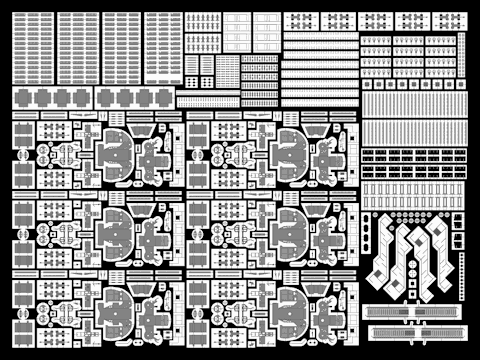
I copied the ruined parts to a new fret and made some modifications.

This time I was prepared for the correct Autocad-to-Illustrator sequence, working more with lines with a given thickness to create meshes, no filling in Autocad but only in Illustrator; this new set was only a few hours of work. The UP-launcher design was one of the oldest and was redesigned. As I’m now more comfortable with soldering, I decided to add new funnel grills and I wanted to solder the cordage reels anyway because the glue bond isn’t that good. Other parts are some wooden gratings for the bridge, an oar rack, some spare pompom sights (I’m quickly running out as they damage easily) and new railing; why not have railing in brass?

Custom Photoetch Set Part IV

In an attempt to further delay the inevitable—that my model might actually reach completion—I designed a new photoetch set. Every time I make a new set I have to change the order of programs for making the masks. I still start in Autocad for its accuracy and ease of us (I find so). However, after having spent many a fine evening with Autocad, pdf-printers and graphical programs, I found myself unable to export the file to a good quality PDF. Circles remain jagged, even when setting the Autocad view setting the maximum, setting the print quality to highest and printing to A0 size. I’ve decided that Autocad is terminally lousy at plotting. Exporting the file (DXF, DWG, all versions Autocad can export) won’t work; the cause is the bad hatch definition in Autocad that other programs as Adobe Illustrator and CorelDraw (latest versions, demo) just won’t accept. I remembered with the previous etch I could directly copy the design to clipboard and insert it into Illustrator. But now I have Windows 7 that runs out of memory while attempting this copying, even though I inserted the full 8 Gbs that my aging PC can handle to avoid exactly that problem. Anyway, away with the hatches and fillings. Reading the lines in Illustrator and filling in all parts, AGAIN, worked.

Here’s the design. I’d love to show you the etched fret. However, the etcher (etchworks) decided that wrapping the etch in crudely shaped cardboard—taped shut leaving all the movement a delicate etch needs to destroy itself while roaming its lush and spacious surroundings—is all the protection you need in the mail. Many parts are now loose, damaged and one or two missing (I did design the lines hold the parts to the fret too thin though). Fortunately I needed only half an A5 and nearly all parts are already etched twice in the fret. If this were a set of railing this would have been a complete failure. Of course, one could ask the etcher to re-etch the design, if this weren’t the second etch already. The first attempt had both top and bottom layers merged on the top of the etch removing all detail and folding lines. The quality of this etch is really good though. I have a few parts designed much smaller than recommended—such as the 0.05mm bars of the sights for the pompoms—and they look wonderful.

The etch itself doesn’t really contain anything new. I removed some design errors from the pompoms and added parts that I wasn’t happy with in the other set. Flag lockers, a few ladders, some parts for the 4″ guns that proved unfoldable (yes, I tried). I also added a selection of rings (always useful), scuppers (overscale, no doubt) and some pulleys, mainly for the funnels. I have a set of custom-made barrels on order from Master in Poland to finish these small pompoms.

Custom Photoetch Set Part III

The etch set presented in Custom Photoetch Set Part II is now done. There was a slight delay as the set received some minor adjustments as required by the etcher and I felt I could add one more part (Type 279 aerial). The set was etched by Saemann Ätztechnik in Germany, with excellent results:
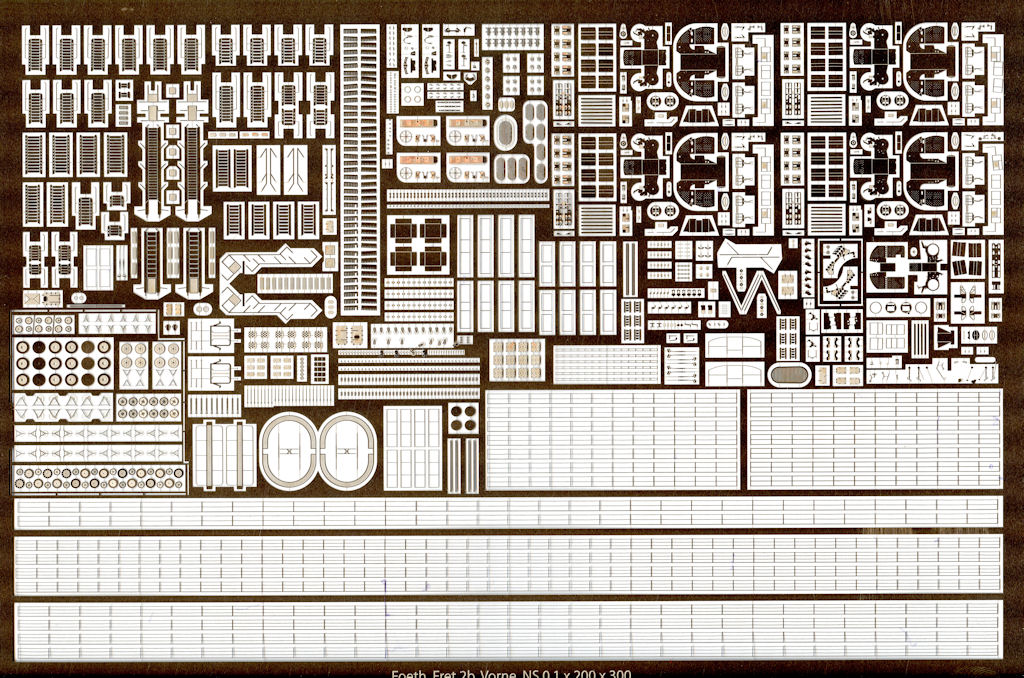
I had three copies made. I decided to spread around the parts so that I would need at least two sets with one for backup. This was probably a good decision; the parts are already falling out of the set as the material holding them in place was designed a bit too thin. An overview with most of the parts is below. The color is a bit off; the material is silvery in appearance.
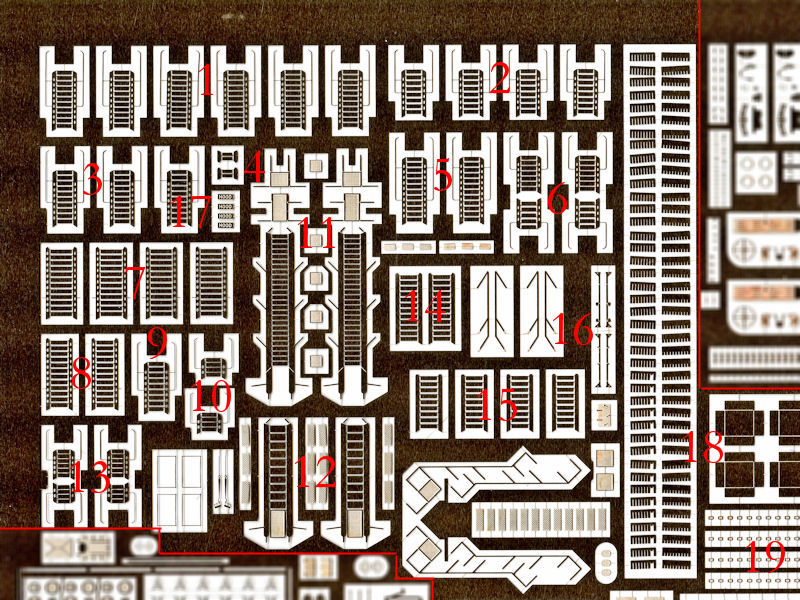
All stairs from the previous set were repeated; I made a design error and couldn’t fold the steps without breaking them. This is now solved. Each deck has stairs etched to size to account for the different deck heights. The spacing between the steps was changed accordingly, so you shouldn’t be able to notice the slight variations in height and span. The model will depict HMS Hood just under way, so the accommodation ladders and stairs on the quarterdeck will be stored.

1 Shelter deck of signal platform
2 Signal platform to conning tower platform
3 Conning tower platform to Admiral’s bridge (large)
4 Behind torpedo control position
5 Admiral’s bridge to fore bridge (direct)
6 Admiral’s bridge to fore bridge (via upper plotting position)
7 Forecastle deck to shelterdeck (wide, outboard)
8 Forecastle deck to shelterdeck (narrow, on centerline)
9 Conning tower platform to Admiral’s bridge (small)
10 Air defense platform to roof torpedo control position
11 Accommodation ladder, shelterdeck
12 Admiral’s accommodation ladder, quarterdeck
13 Fore bridge to compass platform
14 Forecastle deck to shelterdeck (forward)
15 Quarterdeck to shelterdeck
16 Quarterdeck stair platform (stowed version)
17 Foot plates with “Hood”, (Checkered foot plates around 12)
18 Flag lockers, grid plus cabinet
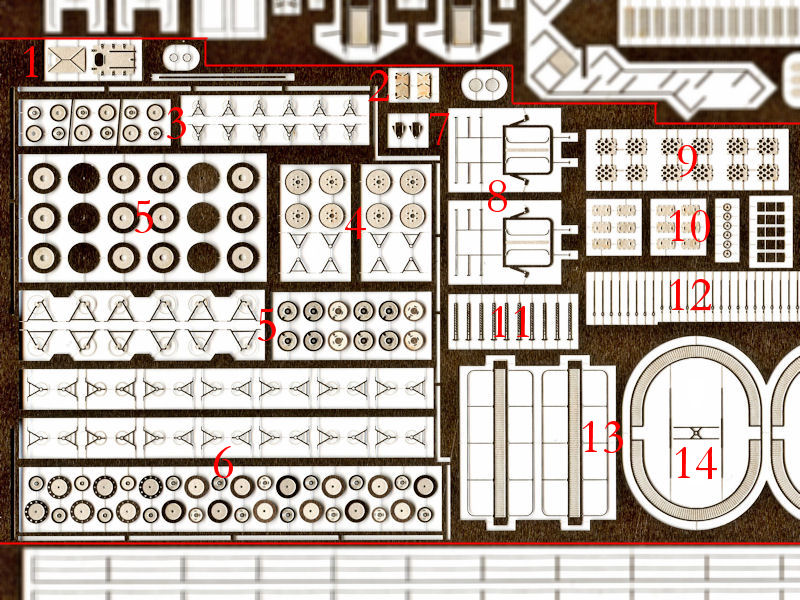
A large selection of cordage reels is included. I found 5 different types and designed them based on photographs on board HMS Hood, and various museum ships.

1 New Quarterdeck hatch aft of Y-turret
2 Hatches for cabinet on main starfish
3 Small cordage reels
4 Medium cordage reeks
5 Very large cordage reels
6 Large cordage reels (two styles)
(Very small cordage reels places elsewhere)
7 Detail for X-turret and 20″ signal light detail
8 Night life buoy (repeat)
9 UP ammo locker hatches (repeat)
10 Assorted detail for electrical winches
11 Semaphores
12 Rigging detail (repeat)
13 Funnel walkways
14 Type 279 radar aerial
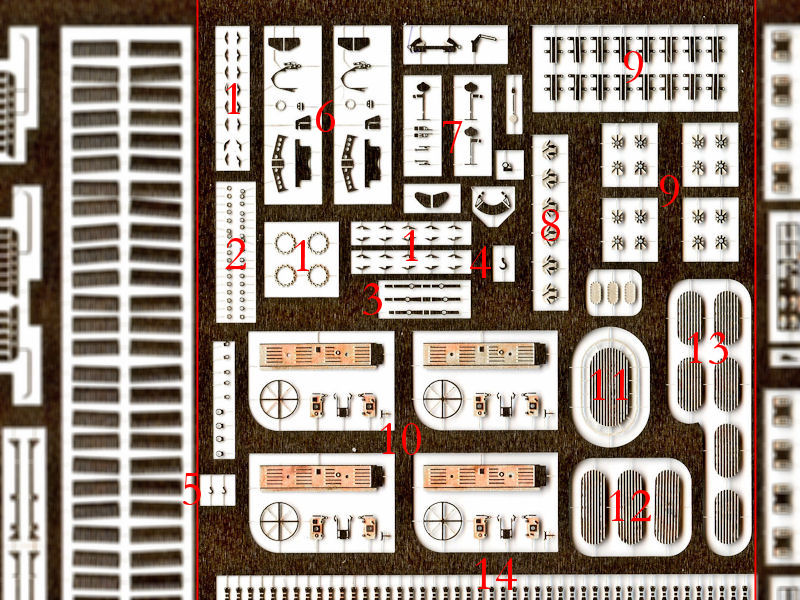
1 Detail for main derrick
2 Assorted eyelets for all derricks
3 Main derrick pulley frames
4 Crane hook main derrick
5 Crane hook small derrick
6 Assorted detail paravanes
7 Assorted detail Pompom director Mk II
8 Escape manhole hatch (omitted in previous set)
9 Assorted detail 4″ gun fuse setters
10 Searchlight lanterns
11 Carley float type 17, 8×12 ft
12 Carley float type 20, 5×10 ft
13 Carley float type 19, 5×8 ft
14 Davit detail
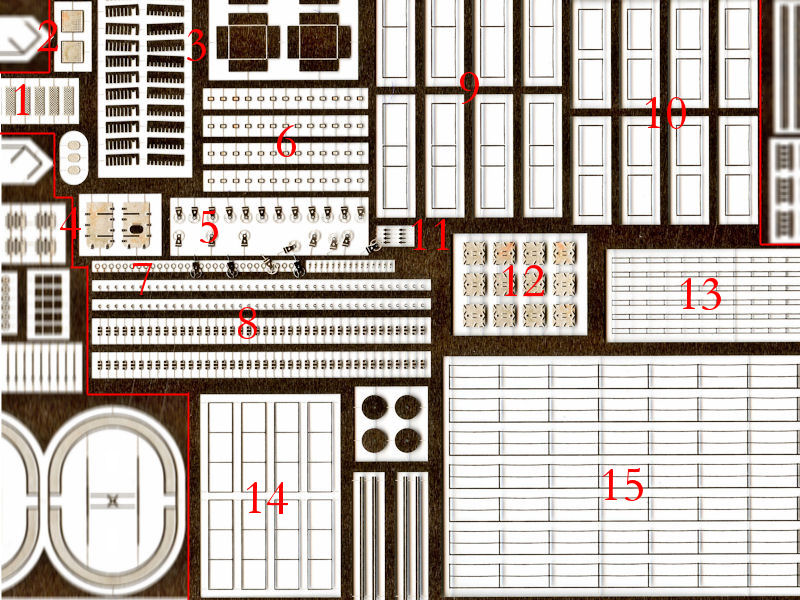
1 Checkered foot plates
2 Small outboard platform of forecastle deck
3 Flag lockers, grid plus cabinet
4 New torpedo hatch (near forward breakwater)
5 Very small cordage reels (not fixed properly)
6 Very small mushroom vents grid
7 Assorted eyelets
8 Awning detail (perhaps too small)
9 Railing around staircases, one end open
10 Railing around staircases, both ends open
11 Torpedo head hatch hinge (on the side of the hull)
12 Hatches ammo storage on shelterdeck
13 Railing around searchlight positions
14 Railing for funnel walkway
15 Railing superstructure (chain)
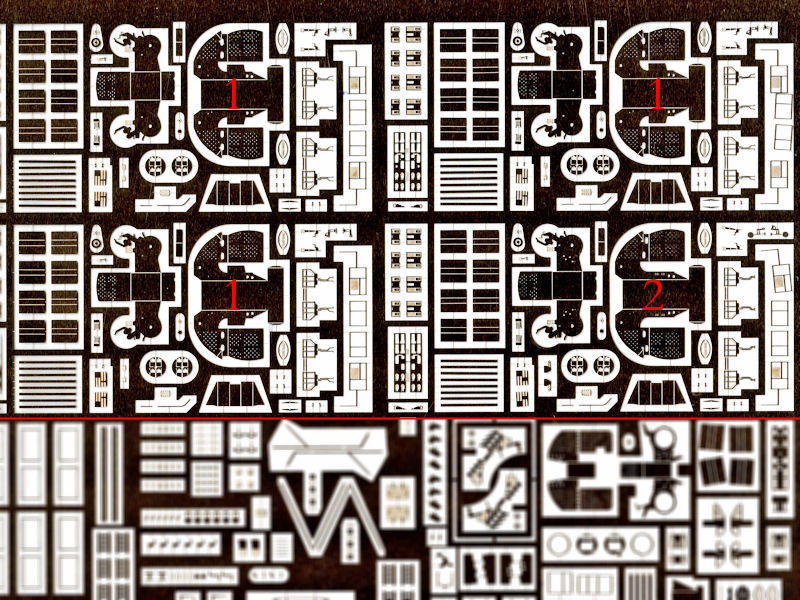
1 Assorted detail octuple Pompom Mk V
2 Assorted detail octuple Pompom Mk VI
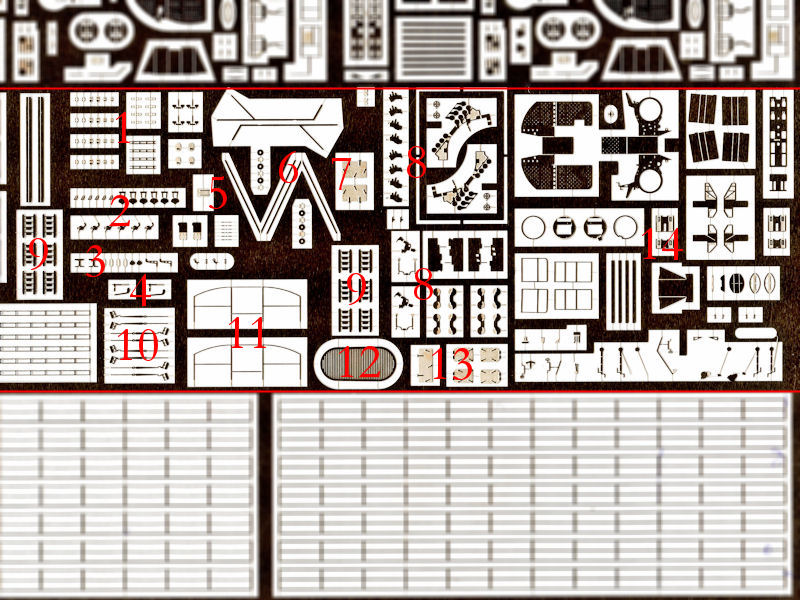
1 Assorted detail searchlight director
2 Assorted detail air-lookout position
3 Assorted detail air-defense officer’s sight
4 Assorted detail Pompom director Mk I
5 New hatch capstan engine room (near anchors)
6 Aerials MF/DF office
7 Hatch
8 Vickers quad machine gun (repeat)
9 35ft fast motor boat ladders (accidentally added twice)
10 Main mast stays
11 Hatch cover frame
12 Hawse pipe cover
13 Hatches
14 Quad Pompom
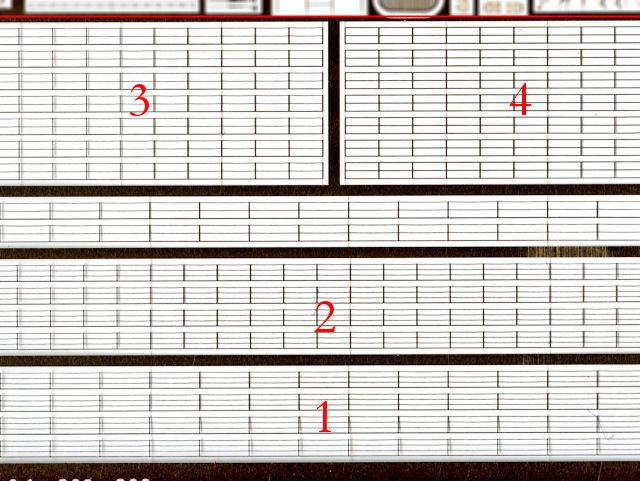
I decided not to use any commercial railing, as HMS Hood has five styles I wanted to have correctly modeled (one being for the funnel walkway). Note that the railing style on the main deck is a wide three-bar , while it has a shorter spacing between stanchions on the shelterdeck. The rest of the railing on HMS Hood is all two-bar except for the funnel walkway. Having two-bar railing above the shelterdeck is a detail missed by most modelers.

1 Railing quarterdeck and forecastle deck
2 Railing shelterdeck
3 Railing superstructure (chain)
3 Railing superstructure (bar)

Copyright © 2025 On The Slipway

Theme by Anders NorenUp ↑